Hey guys, this is Sam. Welcome back to another episode of “OMG WHAT HAPPENED”!! Aka everything I did wrong while developing my own films at home.
Recently, I made the biggest mistake on my home developing journey, which resulted in developing a completely blank roll. Yeah, I know, I was devastated… I almost gave up on developing my own film altogether. So today, I want to share with you the four mistakes I’ve made so far in developing film at home, so hopefully, this never happens to you.
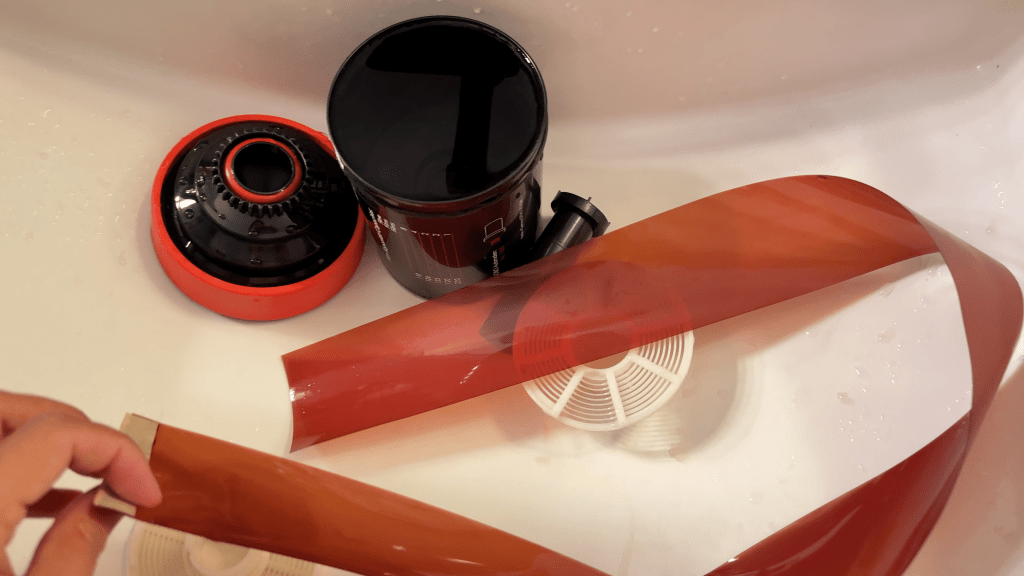
I use a home developing kit to develop my films. I have a video here on my channel; I will leave a link somewhere if you want to check it out. But these mistakes can be made regardless of the tools that you use.


Mistake number 1: After pouring the chemicals into the can, I let it sit flat for too long. This mainly applies to medium format film. After you pour your chemicals into the can, get it rolling fast, whether you agitate the can by hand or put it on rotation wheels. If you let the can sit too long, the film will be unevenly developed. You may see a clear line crossing your negatives, like this. That’s because the bottom of the film got developed longer when the chemicals sat still, like this.
This is somewhat fixable in post; you can get rid of the clear line and manually smooth out the exposure difference. But it’s better to not have it in the first place, right?
Mistake number 2: Chemical contamination. I started using an open cog instead of the sealed lid when I first encountered the bubbling blix popping open the lid problem. Then this led to another problem: since the can is open, if I sometimes pour too much blix into the can, or when I mount or unmount the can on the turning wheel, some blix might leak into the water bath. And the water might bleed into the next batch of development. That will result in color shifting of the negative. You can see in these photos, the brown color on the edge is pretty obvious.
Using a sealed lid or hand agitation without a water bath might help avoid this problem. If you see blix dropped into your water bath, you might want to change the water before your next load. Also, cleaning the can and your chemical bottles well to avoid cross-contamination is very important for a clean develop.
If it happens, you can also try to save it by editing out the color shift. It’s kinda tough to clean it out completely, so just be careful in the first place.


Mistake number 3: Overlapping negatives. This also only happens when developing medium format film. The standard film wheel allows you to load 2 rolls of 120 film. The wheel I use has this little stopper; you open it when you load the first roll, and when the first roll is loaded, you close it to stop the 2nd roll from advancing, then you load the 2nd roll. If you load it correctly, one wheel will fit 2 rolls just fine. BUT, since everything is done in the dark, you can’t see the wheel, the little stopper might fail sometimes, resulting in the 2 films overlapping each other. When the 2 films stick together, the chemicals cannot evenly reach the surface, then it’ll look like this… yeah, there is no saving from this.

When this first happened, I thought I wasn’t being careful, so I developed another 2 rolls carefully, then it happened again, and it was even worse. From there, I was scared of loading two rolls of film onto one wheel. Later I asked around other film photographers who developed their own films, and there are two solutions they suggested to avoid this.
- After we load the first roll, there is always a piece of tape at the end. Instead of peeling it off, we can stick the beginning of the second roll together with the end of the 1st roll to make sure they will not overlap each other.
- After loading the first roll, turn the 2nd roll upside down, facing the opposite direction like this. Even if they overlap each other, there is a much better chance the film will not stick together, and it will both get developed properly.
They both technically sound like good ideas, but to be honest, I haven’t tried these methods myself yet because I have been developing one roll at a time like a coward. I will try it eventually. If you have also tried it, please leave me a comment down below to let me know how it turned out. Or if you have better ideas to avoid this, also let me know.
One other important thing I’ve found is that if you’re developing film back-to-back, make sure to dry your reel completely before loading the films. When the reel is wet, you’ll feel resistance when loading, which can confuse you about when the film should have stopped.
I think with more practice, the more you do it, the better you can sense it without seeing, to know when the film should’ve stopped… So, stop being a coward, shoot more, go practice it, Sam.

And, lastly, the empty roll. I will give you 5 seconds to think about what might have happened. When I first saw this roll come out completely empty, you can’t imagine how upset I was. My first thought was something happened to my camera, that I didn’t expose the roll, but I had just used this camera not too long ago, and everything turned out fine. Plus, if I hadn’t exposed the roll, I should still see the film name that’s printed on the edge, right? There is nothing, very clean.
Then I thought it must be the chemicals; did I accidentally pour the wrong chemicals? But I was using a 2-step bath, and the color of the chemicals are very different. There is no way I would pour the blix before the developer.
And once again, I asked other film photographers, and I was told, my chemical might be expired. Then I realized, yeah, I was using the very last bit of the developer I had sitting for a while. Before I developed this roll, I kinda felt the developer looked kinda too dark… but I was too lazy to start mixing a whole another batch of developer, and here we go, I destroyed this entire roll… and thanks to my cowardliness, I only loaded one roll; otherwise, 2 rolls would be destroyed.
Then I asked other film photographers how to tell if the chemicals have lost their developing ability. The best suggestion I got was, when in doubt, just don’t. Chemicals are not cheap, but it’s cheaper than the film you shot! If your chemicals have been sitting too long, or if they were exposed to sunlight, if you see the color changed, or you see precipitate in your chemicals, just don’t use them. If you are not sure, don’t risk it.
If you want to risk it, you can do a snip test, which is cutting a piece of your film and putting it in the developer. If it turns out black, your developer should be fine. If the film looks pretty thin or even clear, then you should use new developer.
Cinestill film’s YouTube channel has a pretty good video on how to test your film chemistry; it covers all sorts of chemicals from black and white to slide film. You can check it out if you want to know how to test your chemicals exactly.
Generally, film developing chemicals can last a pretty long time if stored properly. Store your chemicals in sealed bottles, use proper containers, keep them away from sunlight, and if you have a bottle that can remove air, even better. These steps will all help preserve the chemicals for longevity.

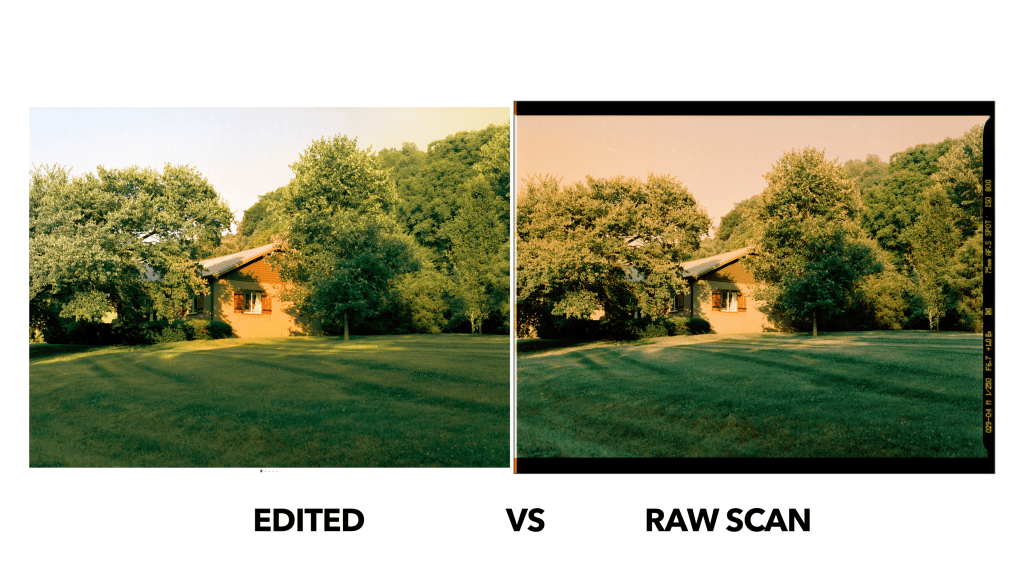
I often feel I’m a very clumsy person, and developing film is such a precise task, it’s like baking… well, that’s why I don’t bake. Shooting film is already a very delicate process; I constantly worry about if I exposed it properly, if I got the focus on point, did the person I just took a photo of blink… then back home, if I mixed the chemicals correctly, if the temperature is good, did I time it right… okay, I open the can, there is an image, good… but how good the image is, is the exposure on point, is there color shift… I won’t know until it’s scanned and converted.
It’s like I shot the photo 3 times: once when I clicked the shutter, once when I see it on the negative, once when I see the scan. After all of these carefully crafted steps, that one good shot just looks… better.
Alright, these are all the mistakes I made… so far… fingers crossed, I will not make these mistakes again. And don’t worry, I won’t give up on developing, and I hope this video is helpful for any of you who have been developing or thinking about developing your own films.
Also, leave me comments if you want to share any other “mistake” you’ve made so I can learn from you. I hope all our films come out nice and sound! This is Sam; I will see you next time.
Other Film Photography Gear I use:
🖨️ Film Scanner: https://amzn.to/3Nbh84H
☀️ Light Meter: https://amzn.to/3Cc6zrS
⚡️ Flash Light Trigger: https://amzn.to/3C8pKmi
🧪 Home Film Processing Kit: https://ebay.us/fzJuc1
👁️🗨️ Black and White Film Developing Kit: https://amzn.to/42lQVof
📚 Photo Books I collect: https://amzn.to/43tvYIF
🎒 Everything in my Kit: https://kit.co/sam_zhang
Affiliate links: Some of the links above are affiliate links. If you choose to purchase after clicking a link, I may receive a commission at no extra cost to you 🙂 Thank you for your support!!
Follow me on Instagram: @itscapturedbysam


Leave a comment